Thursday, September 26, 2013

House Plants and Upcycling

Along the path of downsizing the number of things you own, you man run across items that you find pleasant to look at, but not useful in the traditional sense. When I think of owning less and having more space, I often try to think outside the box to find non-traditional uses for items. This helps us use what we have for what we need at the time.

Many everyday items can be used for things you wouldn't think of. For example, I love house plants. I have many a pot with greenery over-flowing. Many of my flower pots are recycled pots, but quite a few are repurposed items. I have pretty bowls and vases that I wasn't using for their traditional purpose, so I potted plants in them. All you need are some small pebbles (or aquarium gravel works well too) under the soil for drainage. This is a great way to keep things that I find pleasing to look at by giving them a job to do. I also like to use saucers and plates as water catchers under house plants to catch the overflow when they get watered. I have quite a few antique dishes that have been used in this manner. This way, it's not just sitting collecting dust and cluttering up my space.


I have a set of teacups that I would never use. Not that I have anything against tea, but I have a cup designated for my hot beverages. I only need the one. However, I have an old-looking tea set that makes a cute display for cacti. 


With a little bit of ingenuity and effort, you can turn old toys into plant holders as well. Some toys may not be suited for this. Any wooden toy will probably rot when exposed to soil and water. This sort of thing is cute and will add a conversation piece in moderation, but don't over do it if you are going for a look that is more adult themed. 


Here is a cool DIY tutorial from Thrift Core if you are interested in converting toys to planters. It has step by step instructions and photos.If you don't have any of the items listed above, visit your local Goodwill or other thrift store. Garage sales are a great place to find things to repurpose for this as well. However, the thought is to use what you already have lying around.

 I hope that you have enjoyed this post and that you have taken some inspiration from it. If you try this, please share your photos and stories. Any questions or comments are more than welcome.  I would love to hear from you.  Have a great day, and as always, happy organizing!

Saturday, September 21, 2013

Upcycle and Repurpose to Declutter

Need more space and less clutter? Don't we all. As I  have said before, with the impending cold season upon us, I feel it necessary to declutter my home. I once heard someone say that a cluttered home is a sign of a cluttered mind. I don't know how true that is, but I do know that decluttering and organizing while cleaning is the best stress buster I know. So, in turn, decluttering the home declutters the mind. Here are a few ways that I have found to help with both problem. You can upcycle, recycle, and declutter without giving up items that you really want to keep, but don't have a practical solution for storage.

For issues of magazines that you cannot bear to throw out (for whatever the reason), simply roll them up and use them to help keep tall boots from sagging and flopping over. The magazines will curl, but are still completely readable. Pool noodles work well for this too.


If you have extra sets of curtains taking up space in your linen closet, double up on them to help keep out cold air. Complementing colors will not take away from the room.  Take some throw rugs out of storage to keep hardwood and tile floors warmer. Place extra blankets on your beds instead of cranking the thermostat when the temperature drops to save on your power bill. 

Stack books that you have already read and bind them together with an old belt or two. Place a cushion on top and you have an ottoman or a small stool that is an instant conversation piece. Leave off the cushion and you have a creative table. 


You can use vintage lunch boxes to store electronics or other small items. You can do this with old lunch boxes that are collectors items as well. It helps to make use of the space that the box takes up. You can also use them to store instruction manuals, journals, or phone accessories. After you have the items tucked away, display the box.

.

Old suitcases can be turned into foot stools or tables with storage or a medicine cabinet. Both require you to alter the suitcase, but the results are amazing. It adds an element of nostalgia to the room. The older hard suitcases work best for this. Consider adding some scrapbooking stickers that look like old postage stamps to give character. 


Old t shirts can be upcycled into produce bags, quilt pieces, bracelets, pillows (just sew three sides, suff, then sew the other), pot holders, table covers, etc. The sky's the limit.

I hope that you have gotten some inspiration for these ideas. If you try any of these and would like to share, I would love to hear from you. Feel free to leave feedback or pictures in the comments below. Good luck and happy organizing! 

Sunday, September 15, 2013

De-clutter for Fall

It's that time of year again. The leaves are starting to change color, the weather is getting progressively colder, and the smell of pumpkin spice permeates everything. Fall is almost here, my friends. The calender says that September 22 is the official day, but I can feel fall in the air already, and I love it! I like to take this time of year, just like spring, and re-evaluate all of my organization. After all, I will be stuck in the house all winter long, staring at my stuff. I want it to look and feel good for as long as it can so that I don't get sick of looking at it. It needs to be aesthetically pleasing, at least until spring, when I do it all over again. Today, I would like to present an idea to you that works great for clearing clutter permanently. It's called minimalism.

I like to keep minimalism in mind when I organize and decorate. The Japanese have successfully made an art form out of minimalism. For those of you who aren't familiar, minimalism is keeping only what you need or what is necessary. A minimalist theme creates more open space and a calmer feel to a home. Below are some examples of minimalist rooms to give you some inspiration before we move on. I also like to call pictures like these organizer porn.


These are just a few examples of minimalist home decor. They create a clean visual effect. They aren't cluttered, but they don't feel empty either. Everything has a place. This is the easiest form of organization to maintain and the space is easier to clean. 

If you would like to employ the idea of minimalism in your home, I would suggest that you start with one room and work from there. Here is a short list of things to get you started.

  1. Start with the furniture. It's the biggest thing in the room. If you have any furniture that can be eliminated without sacrificing convenience or comfort, then do so. 
  2. Keep only the essentials. You don't want to keep things that you don't use or don't need. Toss out things that are out of date. 
  3. Clear your floors. Nothing should be stored or stacked on your floors. If you can't store it out of sight, donate, sell, or trash it.
  4. Clear off all of your surfaces. Items should be stored in drawers or baskets out of sight. This creates the illusion of less stuff.
  5. You will want to clear your walls of excess decorations. In a minimalist home, there are only one or two pieces of art on the walls of any given room. Think about choosing simple art as well to compliment the theme you are working with.
  6. As you are storing things out of sight, you may be running out of room. Before you head out to purchase a bigger storage container, stop. Re-evaluate the things that you are keeping. Are they all necessary? Do you use them all? The answer is probably no. Down size. Minimalism is about owning less. 
  7. Plain window treatments and simple patterns work the best. Simple bamboo blinds look great with this kind of style. Do not put curtains with blinds. It over complicates things. Block prints or plain colors are great for furniture and bed clothes.
  8. When choosing colors, try not to go with overly bright colors. Most minimalist designs work with a simple color pallet. Classic black and white are favorites. Don't be afraid to add a pop of color to each room, but do it with something smaller, such as a rug or pillows. Working with a complimentary color pallet for each room adds uniformity to the overall appearance,
  9. You must have a place for everything, and everything must be in its place. With this kind of decor, anything left sitting out or simply out of place will throw off the room. 
  10. After you have finished, sit back and enjoy the peaceful feel of the room. Without the over complication of clutter and things you don't want or need, your home will feel entirely different. Also, without all that unnecessary stuff, you will have more space and more time because you won't be constantly re-arranging your things. 


Keep in mind that this style is not for everyone. I find it to be a great concept and thought that I would share it with you. I strive for this sort of organization, but often fall short. If this is something you really want to implement, don't give up. Our homes are all works in progress. Over time, with being persistent, you will achieve your goal.

I hope that you enjoyed this post. Questions and comments are always welcome, as are stories and pictures. I would love to hear from you. Good luck, and happy organizing!


Thursday, September 5, 2013

Craft Storage 103

I have recently started actively art journaling. By this, I mean that I have started actively collecting materials to use in my art journal. You can use so many cast off items as valuable art journaling materials. There are the scrapbooking materials that are used. There's jessop and paint, and don't forget the "found" items. I like to take apart old jewelry and often incorporate beads from my jewelry making supplies as well. Art journaling is a mixed media activity. It is very easy to accumulate materials faster than you can use them.

 I have a very simple system of organizing my art journaling supplies. The paint and adhesives fit right in with the system I have in place for craft items in general. My past past craft organization blogs are here and here, in order. However, there are some extra supplies that go with art journaling, such as collage components, recycled packaging, and found items. Here are some simple solutions that I have used.

Children's school folders make great "catch-all's" for paper components such as magazine clippings and fit on any bookshelf. They are available anywhere school supplies are sold and shouldn't be more than $1 each.

I found this dish drainer at Goodwill for fifty cents. I later realized that it was cracked and leaked water, but it works very well to hold all of my recycled packaging. Plus, it was only fifty cents. Thrifty!

Small plastic baskets are my go to option for storing "found items". I have plastic bags to hold the smaller items and make it easier to search. The tin holds small metal pieces and old jewelry that I will use. These baskets fit easily onto shelves or slide under tables to keep them out of sight. I purchased this one and a few others from a Dollar Tree store and they were only $1 each.

Organized in this fashion, my art journaling supplies take up very little space and blend in well with the rest of my craft supplies. I am lucky enough to have a home office/ crafting room all to myself. If you don't have this option, may I recommend a sturdy set of plastic (or wooden if you would like to spend a little extra) drawers. 
Models with smaller drawers at the top allow you to separate paper components that need to be handled with more care. Larger drawers at the bottom work well for oversized items and are easily separated with smaller baskets. These are available at stores like Walmart and they often offer the option to build your own.

I hope that you have enjoyed these tips on organizing your art journaling supplies, whether you are an old pro or just starting out like me. If you have ideas, or try any of these methods, I would love to hear from you. Feel free to share any pictures or stories. Good luck and happy organizing!

Tuesday, September 3, 2013

Organization and Upcycling

Aluminum is one of the strongest materials used in the production of everyday household items. While most areas have a place to recycle aluminum soda cans, it can be hard to recycle food cans because the amount of aluminum used is much lower. Why not clean and reuse some of those cans to help with everyday organization?

Why not reuse tuna cans to organize small items, such as office supplies, in a shallow drawer?


Mount cans to a kitchen wall to hold cooking utensils. 


Mount them to a magnetic board to better manage art supplies.


Use paint, contact paper, and add embellishments to dress them up for a beautiful touch.

These cans can be decorated numerous ways. If you can imagine it, you can do it. They hold a variety of object to help keep your life together. In return, you keep them out of landfills and the environment. The pictures here are just a few examples of how to use cans and how to get started making them your own. If you try any of these projects, I would love to hear from you. Feel free to send pictures and stories. Thanks for reading, and as always, happy organizing!  


Tuesday, August 20, 2013

Craft Storage 102

Welcome to the second part of my series on organizing craft supplies. Here, I hope to help you wrangle the trickier supplies. Most crafting activities have one thing in common: small pieces. From buttons and beads to stickers and zippers, these tiny pieces can be hard to get -and keep- in order. For all of my tiny misplace-ables, I use inexpensive plastic boxes that have separate compartments inside. The compartments are often adjustable in size and the boxes are available in many colors, but are most often clear so that you can view the contents without opening the box. They are sold in craft stores, Wal-Mart, Lowe's, and can often be found in second hand stores like Goodwill. They hold and separate beads, buttons, embellishments, thread, needles, small stickers, small tools, and the list goes on. They come in various sizes, but sturdier ones (the kind made for hardware) are a bit pricier. I find that the kind sold in the craft section of Wal-mart hold up just fine to the bits and pieces that I put in them.

Make friends with this guy.


Yarn is another item that is difficult to keep in order, especially if you accumulate a lot of it. I prefer a nice wicker basket to keep in the floor. It's pretty large and keeps my yarn on display. If you have more that a few skeens, however, you may want to invest in some of the stacking crates that I suggested using here to help store shoes. They also make a great home for yarn. Another creative way to store yarn is in the over-the-door pockets that most people put shoes in. I have to give credit to indlugy.com for this wonderful idea.


A pencil case is a handy way to keep all of your crochet and knitting needles together and would go nicely with any of the storage options I have listed for you. Pencil cases are a good way to group any writing utensil and I find that they work well for storing jewelry tools, such as pliers, wire cutters, and the like. You can find small plastic ones in the school supply isle for $1 or under. Larger ones may be a bit more, but they last for years. If you want to go all out, you can always buy a tool box from the hardware section with many divided spaces to keep all of your tools together. 

As always, if you have any ideas that you would like to share or questions, please feel free to to leave them in the comments below. You can also find me on various social media networks, listed here. I love hearing from you. I hope that you enjoyed this post and were inspired. Until next time, happy organizing!

Friday, August 9, 2013

Craft Storage 101

Lots of people, both men and women list crafting as a hobby. It relieves stress and focuses the mind. Many even find that their crafting can turn into a very lucrative endeavor when the apply themselves. Crafting requires supplies. Many are small, but a few can be considered big, bulky, and hard to store. Many people, such as yours truly, do not limit themselves to only one kind of crafting activity. That means more supplies. If you are a multi-crafter, then you know just how much organizing your supplies matters. In this three-part series, I'm going to share with you what has worked for me when storing things correctly means the difference between actually getting to work on your project or spending your allotted time looking for that one thing that you know you have, but can't seem to find.

I consider myself a recovered "cluttered crafter". You may laugh, but I have been working in all sorts of mixed media crafts since I was a child. I don't waste craft supplies, so I have amassed a lot. It takes work to keep it all in a neat and orderly system. I really did not care about how it was all organized until I started losing things that I needed. I knew that I have the item, I just could not seem to locate it. Sometimes I would find it a time later, only to realize that I had lost the project I was working on. Something had to give. Craft supplies are not cheap by any stretch of the imagination. Finding them on clearance is blessing. Losing them in my own home was a waste of time, money, and effort. I really do hate to waste things.

To start off, as a general rule, crafting supplies should be stored in a cool dry place away from sunlight. You can add them to my list of what not to store in the bathroom. I have jokes. Moving on.

Scrapbooking seems to be a really popular activity. It requires its own plethora of supplies. There is paper with different patterns, stickers, rub-on transfers, paper punches, stamps, ink, adhesives, cardstock, page protectors, scissors (regular and sets that cut different shapes and patterns), specialty pens, photo corners, and the list goes on and on. There is a lot to keep up with, and I did not even list the actual album that you will be working in or the photos.

To  keep most of your flatter supplies in check, may I suggest a large accordion folder. They help to separate paper by size and pattern as well as keeping stickers and other small items in order. It is separated, but together.


Pens, brushes, and cutting tools do nicely in a multi-sectioned pencil cup. If you can find one with a lazy susan bottom, it is so much easier to spin and browse supplies, ultimately finding things faster.


 If your supplies overflow these containers, you may want to look into a large tower of plastic drawers. These are wonderful for keeping stamping items in. I cannot tell you how functional these really are when organizing anything. I have pictured the sets from department stores in previous blogs. Here, I'm going to show a few specialty towers available in craft stores and online.


These work great to store other supplies as well. Polyclay and related items do well in these drawers. To organize smaller items, such as findings, glitter, or glaze, simply insert small plastic baskets as separators. You can find them in different sizes in sets of two for a dollar at Dollar Tree stores. If you have a lot of heavier supplies, these towers tend to sag under the weight and become unstable. 

For heavier items, such as paint bottles, large containers of adhesive, and bulky paper cutters, you need something sturdier. I would suggest shelving with a good amount of weight capacity. Invest in a quality shelf and it will last years. Lowe's offers great shelving. The plastic ones are less pricey and go on sale from time to time. You just have to check your local stores. Grouping smaller items (like paint bottles) in baskets on these shelves helps you to use all of the available space. Make labels for the different baskets so that you will know what is inside without taking the whole basket out. Just use your imagination and replace the items below with craft supplies. 


Next time, we will tackle some trickier to organize items. If you have questions or comments feel free to leave them below. I would love to hear from you. Thanks for reading and happy organizing!


Monday, August 5, 2013

Don't Breakup with Your Makeup

How cheesy is that title? Velveeta should own it. I know. I know. Moving on. Cosmetics are a part of many women's (and some men's) days and for good reason. Makeup allows us to play up (or down) features. It's like becoming a new person when you have the right makeup. It can boost your confidence, making you feel great about yourself.

Storing your cosmetics correctly extends the life of the product, thus saving you money. Cosmetics expire just like everything else. Most people don't know when to toss an old product.The FDA does not require that they list the expiration date, although some do. makeup, like food will breakdown and bacteria will begin to live in it. No one wants bacteria on their face. Old makeup can cause eye and skin irritation, breakouts, rash, allergic reactions, and the list goes on. In general, any funky odor or color change is a good indicator of what to chuck into the trash, but here is a short list to help you know what to keep and what to toss for health reasons:

  •  Mascara has a shelf life of only 2 to 3 months. However, if you see it clumping, it's time for it to go.
  • Lotion can last for up to 2 years! A change in color or smell is a dead giveaway that it has gone to the dark side. Opt for the kind in a "squeeze" or pump bottle over the jar because bacteria tends to live in jar lotion more abundantly.
  • Liquid foundation and concealer typically last from 6 to 12 months. Look for a change in color or if the product separates into layers it needs to go. Bushes should be washed frequently and sponges tossed after each use. 
  • Lipstick and lip liner will last around 2 years. If you notice that it has become dry, its probably time to get a new tube or stick.
  • Lip gloss only lasts 1 year. When it gets extra sticky, its bad.
  • Powered eyeshadow is good for 2 years. The older it gets, the more dry and flakier it will get.
  • Perfumes can last from 8 to 10 years, but if the smell lightens or the fragrance changes, chuck it out.
  • Nail polish is said to last from 1 to 2 years. When it gets goopy or you cannot get it to blend when you shake it, its time to update your color.
  • Cream eyeshadow and blushes last 12 to 18 months.
  • Pencil eyeliners last around 2 years. The act of sharpening them extends the life of the product.
  • Liquid liner is only good for around 2 months, which to me isn't long enough for the price you pay.
Now that you have cleaned out your makeup stash, it's time to organize all the keepers. If you have lots of makeup, like I am guilty of, you are going to need more storage space, but you still want to be able to find what you need easily. My favorite go-to storage for make up is a set of the plastic stackable drawers. They are available at most stores and are relatively inexpensive. The come in a variety of colors that you can mix and match, and best of all, the number of drawers is up to you. You can buy as many or as few as you need and stack them in a convenient place. Makeup should be stored in a cool, dry, and dark pace when not in use. See my post on how to store cosmetics here. There are companies that manufacture makeup specific storage drawers, but they are pretty much the same as the drawers I show here, just pricier.

A few drawers for a few items.


Or more drawers for extra storage.

If you do not have an overabundance of makeup or you just want one container, Caboodles come in all shapes and sizes and most have a mirror to help with applying cosmetics. They also come in a variety of colors and work for storing other items as well.


This is the one I got as a teenager and still have. Very durable.


A large drawer with plenty of space dividers makes a great storage space for makeup. It is easy to see what you have and with a little organization, it can look beautiful. 


The stand that I showed you in my last post would work great for makeup storage as well. The possibilities are endless. Use your imagination and the space that you have available. See what works for you. I'm sure that no matter what you come up with it will be beautiful. Feel free to send me pictures of any space you have organized, I love seeing what you come up with. Thanks for reading and happy organizing!

Tuesday, July 30, 2013

All the Small Things

Do you often find yourself fighting to disentangle your necklaces? Are your bracelets tossed together in a manner that denotes a recent explosion? Belts in a pile? Scarves draped in odd places? Having trouble locating your favorite shade of nail polish? If you answered "YES", or even a less resounding, "yes", to any or all of the above questions, then, welcome to my guide to getting all of the smaller, yet still very important things in your life organized.

If you need to start from the beginning and get your clutter cleared, you can read my first post on here. The next few will walk you through getting the rest of your home organized room by room with tip and tricks that have worked into a lasting system for yours truly. I am not what you would call an organizing guru, but I know what solutions work to keep real people organized in real life with organizing systems that are easy to implement and even easier to maintain. In short, they really are solutions.

One of my favorite quotes is by William Morris. "Have nothing in your houses that you do not know to be useful, or believe to be beautiful".  I try to keep this in mind when I'm deciding if an item is clutter or not.

 With that said, you will want to start this project, as we have all the others, small. Take one category at a time. Here, I am going to start with nail lacquer. As I have said previously, Michelle Phan (http://michellephan.com/) advises pulling nail polish in the fridge. If you are anything like me, then that isn't a practical idea. I'm not saying that she is wrong, just that it doesn't work for me. However, I do agree with her logic. Nail lacquer needs to be stored in a cool, dry, and dark place to preserve the product and extend its life as long as possible. Don't keep it in the bathroom (see my previous post for what not to keep in the bathroom). I find that displaying these creates a small pop of color to a room. I have created a display stand for all of my nail color. I used dishes from the Dollartree (dollartree.com) and some old vases that I already had. You can find them at Goodwill or another second hand store for very little.

I don't keep it beside this window, it was just a better place to take the photo.


It was very inexpensive to make. I had most of what I needed on hand, but if I had purchased the items, the price would not have exceeded $10. If you would like to make your own, you can check out Anneorshine (http://www.lifeannstyle.com).  I first saw her tutorial on youtube.com and thought "what a great idea". I took me about 3 weeks of rolling it around in the back of my mind to finally decide to make it.  Below is her tutorial. While you are there, check out her channel. Like and subscribe for some great ideas that are a lot of fun.


Moving on to necklaces. I have tons. I make jewelry and it tends to add up. A lot of the pieces that I make end up in the "keep" section for a time. I like what I make, so I often wear it. It's a great conversation starter that often leads to a future customer. I don't think that any conventional jewelry box would accommodate all of the necklaces I have. I love having things displayed in a way that is both beautiful and practical. Hanging a curtain rod on the wall as a display tool occurred to me recently, so I implemented it, first for my scarves and then another for my necklaces. It works great for bracelets too. You can also install these inside or closets to utilize all of your available space.


A few of my necklaces


My scarves


If you don't have a curtain rod, or a space to hang one, consider a clothes hanger that has the wooden dowel to hang pants with it. The one I have pictured below is the kind with a metal frame that allows for one end ot the dowel to be removed so that you can slide things onto it. I found a set of ten of these at Goodwill for $3.


Hangs neatly in with your other clothes


I'm sure there are other great ideas floating out there just waiting to be grabbed and used. When I find new things that I work, I will share them with you. If you have tried anything I've posted here, or you have an idea that you would like to share, feel free to do so. I would love to hear from you. The links to my facebook and twitter are on my profile page. I hope you enjoyed this. Have a great day and happy organizing!

Thursday, July 11, 2013

Continuing Organization

I know that this is totally off schedule, and for that I apologize. I had a loose schedule going with this blog and then life happened. Moving on. This is the last part of my three part series on getting your home organized. In the last two tutorials, I covered conquering clutter and organizing most of the rooms in your home. Today, I'm going to walk you through the last couple of rooms and give you some ideas for getting them organized. Also, as promised, I will add some photos from my home so that you can see what I use.

Let's start with one of the most used rooms in most homes. You may call it the living room, family room, man cave, etc. This room serves as the entertainment center of your home and is most likely what guests are exposed to the most. It is a reflection of you as a host/hostess. Odds. are, this room gets the most foot traffic of all the home. It has dvds, game systems, seating, books, and other forms of entertainment. My family room has all of these items, but if you have children or pets it will probably have some of their toys as well. A room that has to be this functional has serious organizing challenges.

Bookshelves are a great way to store more than books. They can hold dvds, board games, video games, obviously books, and a plethora of other items with a little tweak here and there. In short, they are a great way to get items out of the floor and to utilize vertical storage space. I love folding storage bins. They can be added to a book shelf to create "drawers" to hold all kinds of items. Smaller items such as extra game controllers or the tv remote can be placed in one of these for out-of-sight storage. Pet toys and smaller childrens' toys can also be placed in a storage bin on a lower shelf for easy access. They are relatively inexpensive and can be found in a wide range of colors and sizes to compliment any decorative scheme.


A neutral color cloth bin goes with any decor.


Use brightly colored bins to accent a shelf or to brighten a room.

I would recommend using bins that are made of a sturdy plastic or laundry baskets for larger items. Placing the bins containing toys on lower shelves helps prevent injuries that might occur from a child dragging a bin or basket off of a higher shelf. Bookshelves can be found at many second-hand stores for a lower price, but if you can't find one, Target and Walmart both offer shelves that you assemble at home, complete with instructions. I tall book shelf can hold many different types of items and is my go-to way to get things off of the floor and organized in a way that keeps them put away out of sight. Keeping your items in drawers or bins helps create the illusion of having less stuff, and therefore, less clutter. 

You can also use the space under your furniture to store things for an out-of-sight effect. Couches and chairs often have space under them that isn't utilized. Storing items, such as magazines or smaller workout gear in short plastic bins is a great way to have these items near if you need them, but tucked out of the way when you aren't using them. The same goes for end tables and coffee tables. Coffee tables with a shelf built in are my favorite. They are the best for placing remotes and other items that clutter the table top.

Think of it this way, the most organized looking homes appear to have less items. This is mainly because the most organized people have a "home" for all of their possessions. By this I mean that everything has a place that it goes (it's home) and they always put the items where it is supposed to go (where it lives). This helps create a better system for organizing when everything has a home. The out-of-sight approach also makes it feel like there is more space in a room and creates a cleaner, neater appearance. 

Moving on to the bathroom. This is the one room that everyone uses. It's also often a smaller room with little storage space. I have this problem and I have had to get creative to develop a system that works for me. Let me first say, that there are a few items that you should not store in your bathroom, because it affects the product negatively. Here is a short list: 
  • Fragrance of any kind. Fragrances, if not stored properly can break down and lose scent or change the way they smell. Two key factors in fragrance fouls are light and heat. The bathroom, because of the way that it is used, produces both of these. Heat, mainly form the shower and light from the need for plentiful illumination required there.
  • Face creams. For the same reasons as above.
  • Make up. Make up reacts poorly to heat and moisture. The shower or bath is the main culprit here as well.
  • Nail lacquer. It breaks down under all three conditions: heat, light, and moisture.
In fact, Michelle Phan (http://michellephan.com/), in fact, suggests that you store nail laquer, fragrances, and face creams in the fridge to extend their shelf life. She has informative blogs and great videos (http://www.youtube.com/user/MichellePhan/videos). More on how I store these items later.

I keep bathroom-specific cleaning products in the bathroom, under the sink. I tend not to keep much under there except the cleaners. They have their own plastic container with a handle, so that I can take them all out when I need them, It's easier to see what I'm looking for and no one likes digging under the sink. These are available at dollar stores for a considerably lower price than department stores.

Plastic caddy with handles make for convenient removable storage.

My home does not have a linen closet and I do not have room in my bathroom to store my towels and such. I took a plastic shelf that I found a a garage sale and after a vigorous cleaning (it had been used in a garage) placed it in the hallway outside my bathroom to store many things. It holds on the bottom shelf in a plastic basket all of my extra bath and hair products. On the next shelf up, I have two cloth storage bins that have removable separators inside. These hold lotion and assorted other products. The second shelf from the top holds my bath towels. On the top of this shelf from left to right, are washcloths in the plastic bin, bath tissue, and cotton balls and q-tips in the small crate. f you are wondering, the closet to the left is unfortunately not for storage. It contains an air duct that was put in after the apartment was built. 


All storage containers on this shelf can be found at DollarTree.com


This has been a little more than I had initially intended to put into the family room and bathroom piece. Therefore, the makeup, accessories, and other small items will have to be in another post. This time, I promise it will be in the next blog. Thank you so much for staying with me this far and I am proud of you for taking the initiative to organize your home. Come back next time for my "All the Small Things" post where I share my tips and tricks on organizing accessories, makeup, and more!

Thursday, June 13, 2013

Organizing Your Life

Hello Friends! It's nice to see that you survived putting your house on a diet and that you are back for the second part of the process. I'm proud of you. You are taking an important step in getting organized and taking back control of your life.

Before we dive into organizing, one tip to help keep the clutter under control is the "one in, one out" rule. All that really means is that if you get a new book, for example, you should donate one of your old books. This will help keep the organizing systems that you are doing to implement in place and working for you.

Now we can move on to what you really came here to read, the organizing! After clearing away the things that you don't need, don't want, or don't use, organizing will be much easier.

 I will be the first to tell you that you don't have to run out and spend a fortune to get organized. You can do just as good and be thrifty. In fact, many thrift shops have just what you need at a fraction of the price! I often find great deals on many items at local Goodwill stores. Other local thrift stores have low prices on organizing accessories as well.  If you are in a bind, and must buy new, dollar stores are a great place to start. I am lucky enough to have a Dollar Tree that's about five minutes away from my home. They carry storage bins, plastic containers, baskets, and many other products that are useful in getting your belongings in order. You can find many larger storage apparatuses at Walmart or Target as well. On sale items are the best, because the money you save can be used on something that will bring you joy, like a night out with family or friends.

On to organizing your things! Let's start (again) with one room at a time. Narrow it down to one section at a time as well. Clothes are a good place to begin. To maximize the available space that you have, start with storing away clothes and accessories that are out of season. Vacuum storage bags are great for several reasons. First, they take bulky items and when the air is removed from the bag, the items are compressed and take up much less room. Secondly, they protect your clothes from insects, mold, and unpleasant smells. They can also be reused when it's time to switch wardrobes with the changing seasons. They work wonders for tucking away bulky comforters and quilts. I tend to use them over conventional large plastic storage tubs that are difficult to handle when full of heavy items.


It seems easier for me to access my shoes when they are off of the floor. My go-to favorite for organizing shoes is an over-the-door shoe rack. This puts shoes at eye level and keeps them out of the way. They come in many different styles. There are metal ones that allow for heavier, larger shoes and the plastic "pocket" type that are good for smaller, lightweight shoes and sandals. If you are lucky enough to have room for shelves in your closet or room, then you have that option as well. The crates that Walmart offers during their "Back to School" sale are stackable and work well for this too.


Plastic Over the Door Shoe Rack

Metal Over the Door Shoe Rack

Stackable Crates

Organizing accessories, such as scarves and jewelry can be made simple by using wall space and creating a set of hooks to hang them on. I have personally mounted a curtain rod and currently hang my necklaces and bracelets on it. It creates an attractive display and makes choosing a piece and then putting it back almost effortless. You can do this with scarves as well. Just find an empty space on a wall and hang a short curtain rod that is sturdy enough to hold what you put on it. There are tons of ways to organize your accessories. I will do a separate blog on some of the ways that I utilize in my home. 

Books and magazines can get unruly before you know it. I am a collector of books in the most nerdy sense. I don't really collect them for their worth, but more like I get attached to the characters in them and then have anxiety about parting with the book after I'm finished reading it. What if I want to read Harry Potter again? And let's be honest, who doesn't, right? So, I have several bookshelves throughout my house that are full of books. When I buy something new, it usually goes on the shelf that is most easily accessible to everyone that comes into my home. Most of my tried-and-true favorites go on the largest shelf in my hallway. Others, like my Grateful Dead Scrapbook that I was luck enough to find on sale, are kept on one of the shelves I have upstairs with other keepsake books. I have a box for books that need new homes and I most often end up giving them to friends or family members. I don't keep magazines longer than 3 months. If there is an article or a photo in an issue that I want to keep I tear it out and it goes in a folder with the family of mismatched magazine "leavings" that I've kept.

A home office is a very useful thing to have, even if you don't work from home. It's nice to have a space dedicated to it. I have a home office/crafting space, so things can get ugly really quick if I don't keep some system of organization going on. I have too many craft supplies to list here, so that will be another blog in itself. On my desk, I have a shallow, flat-bottomed basket with different containers in it. I have one, three compartment pencil holder, one wire pencil cup and two repurposed coffee mugs (that I thought were nice) to hold various pencils, pens, and other tools. Everything is sorted by what it is (i.e. pens in one cup, pencils in one cup, Sharpies in one section, etc.) and it's all within reach. Small plastic containers work great for corralling office supplies as well. An office tour will have to accompany the "craft supplies" blog, I suppose.

In the kitchen, we don't always have the space we need. I know that I don't. It's easy to designate a cabinet to plastic food containers and just close your eyes and throw it in......... that is, until you need it again and have to dig through all those mismatched lids and bowls that are scattered in there. It's best to get a small plastic stack-bin to stand all of your lids up so that they are easy to get to and easy to find the one you need when you need it. Organizing is about making your life simpler and allowing for better time management. Pots, pans, and even dishes can benefit from adding metal shelf dividers. This stands the item on it's side and makes for easier retrieval and return while utilizing vertical space within cabinets. If stacking is your thing, however, locker shelves let you make use of vertical space for plates, bowls, and the like.


Stack-bins for Plastic Lids

Metal Shelf Dividers

Locker Shelves for Your Plate-Stacking Pleasure


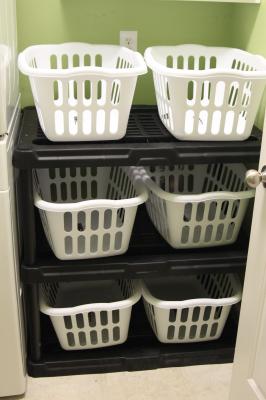
Your laundry room is one of the most versatile rooms of your home. It collects all of your laundry, dirty and clean, and if you are anything like me, it's a catch-all for things that are out of place. It's good to have a sturdy shelf here to stack detergent, fabric softener, and anything else you use to clean your clothes. I love to use smaller laundry baskets on shelves like drawers. It makes it easy to take the whole basket down when I need to get an item and it prevents stray items from falling off of the shelf, keeping everything together. You can find great shelving products and ideas at Lowe's. 

Shelf and Baskets from Lowe's


If you made it this far, thank you so much for reading! I'm cutting this "short" so that you don't fall into a coma (and you have a reason to read my next post). I will go further into detail on a few things as well as go over the rooms that I skipped in the following update. Thanks again for reading and I hope you join me again.


Note: None of the photos above are mine, they all came from google.

Wednesday, June 5, 2013

How to Take Control of Clutter

Lately, as it often does at this time of year, the "spring cleaning" bug has bitten me. It occurs to me, that like many other Americans, I have too many possessions. This is the root of the problem. Having too many items leads to being disorganized and feeling like your stuff has control over you. I would like to share with you some of the tips that I used to get started on the path to being better organized.
 I start by downsizing what I have by eliminating what I:
  • do not use
  • do not need
  • do not want
These are my top three reasons for something being put on the first train to somewhere else. You may give these items to friends, have a yard/garage sale, or donate them to a charity of your choice. Start slow and appraise the items one at a time. That way, when the item has been deemed ready to leave your home, you won't want to take it back. I like to start with one room at a time and one type of item at a time, this makes it easier to get through the process of discarding the above mentioned item.

The best place for me to start is in my bedroom, and my clothes. I know that it sounds like a bad Clue rip off, but I assure you, it isn't murder. Start with the room that you feel comfortable with or the room that gives you the most trouble. With clothes and accessories, you should get rid of anything that is too big, too small, torn beyond repair, or that simply doesn't fit your life anymore. Enlist a good friend if you are having trouble parting with clothes. I like to take my band t-shirts that fall under these categories and cut the graphic part of the tee out and trash the rest. I'm saving them until I have enough to make a quilt top. This could work for kid's clothes too. Next to accessories. Too many shoes? Toss what has holes, hurts to wear, or simply just is not functional. You get the idea. Move on to belts, scarves, jewelry, etc.  I would only do one room a day unless you are one of those lucky people that don't have to purge your home at one go. If there isn't a lot to go through in one room, pair it with another that is the same amount of work. Don't try to get it all done in one day. 

 I am personally terrible for bringing in things over the course of winter that I will be getting rid of around this time. New craft projects and supplies are my number one thing to look for in the cold months, but with warmer weather, crafting may not be so high on my list, so it's time to go through what I have accumulated.  It is also a good time to go through all of those well-meant presents that you received during the holidays that fit into one or more category above. Take stock of what craft supplies that you have. If there is anything that you do not foresee yourself using for anything, it may need to go the way of the Dodo. You can always donate it. Also, if you are anything like me, you have finished craft projects laying around, you may want to find new homes for those as well. Many make great gifts.

In the kitchen, a big problem for most of us is plastic containers that have been separated from their lids. If you aren't using the container, toss it. Plastic breaks down after a while, and odds are, that lid isn't coming home. Any canned food that you do not see your family eating can be donated to food banks, or given to a neighbor in need. Throw away any spoiled or outdated food. Also, never keep old cleaning supply containers if you don't know what is in them. 

Next, consider entertainment media. Will you watch that dvd again? Will you reread that book? Do you need cd's? The answer is often no. You can save music to your hard drive and put it on any mp3 player or iPod. Your dvd collection is likely full of movies that you will never want to watch again in the near future. There is always Netflix or sites like it. Video games are another item that easily fall into this category. You can trade in recent games to many game stores to receive credit towards new games that you will play. Some offer cash but it's less than the credit you would have gotten. many also take dvd's and mp3 players. You can take cd's to second-hand stores for a few extra bucks. Books can be sold to used bookstores or donated if you are feeling charitable. All items can probably be sold on eBay, but that takes time. You need to get this stuff out of the way so that you can start organizing the things that you want to keep and so that you don't pick up these items and bring them back into the fold. If you are in a rush to get it out and you aren't  worried about money, many Goodwill stores accept on-site donations, and they give you a form to add to your taxes for a charitable donation write-off.

Then, I move on to evaluating what I have left after putting my house on a diet. Are the items that I have left relevant to me? If the answer is yes, then I start organizing. If the answer is no, then re-evaluate what you still have.
 Ask yourself these questions?

  • Am I only keeping it because it was a gift?
  • Does it give me joy?
  • Is it a practical item that could be used (reasonably)?
  • Is it difficult to care for?
  • Are you keeping a bunch of nick-nacks for sentimental reasons?
  • How much does it really mean?
If it gives you joy to look at it, such as a small bobble that you and someone important to you acquired on a special trip, keep it, but only if it is not in your way. If it's obstructing travel through your home, such as uncle Ray's card table (but you don't play cards) you may want to reconsider. I will start with sentimental items, because these are a big part of this last group for many people. All items cannot be sentimental. You must part with items sometimes that are just taking up space. Never keep anything only because someone gifted it to you. Hanging onto something because you will feel guilty for letting it go is only hurting you. Odds are, the gifter is going to ask you where the item is the next time they visit. Keeping some sentimental things, such as great-grandma's antique ring, is understandable.

Free or empty space in your home is okay to have. It may be waiting for the perfect piece. Letting go of items that are not helping you in some way is okay too. Having too much stuff in too little space is not. The popular t.v. show "Hoarders" is a nightmare for me. I want to go through my things again one extra time just thinking about those people. It inspires me to do better with organizing and only keeping what I use, want, and/or need. You will feel better when you have gotten rid of things that you didn't use, didn't want, or didn't need. Your home will feel cleaner and less cluttered instantly when the items are gone.

Join me next time for my advice on organizing the things survived the cut.